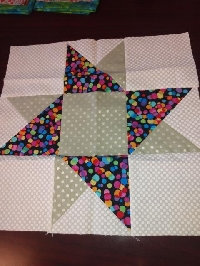
QnT Polka-dotted Party Hats #4
Launch gallery slideshow

| Swap Homepage: | United States |
| Group: | Quilts n' Things |
| Swap Coordinator: | perkl8r (contact) |
| Swap categories: | Quilting Sewing |
| Number of people in swap: | 2 |
| Location: | Regional - United States |
| Type: | Type 3: Package or craft |
| Last day to signup/drop: | October 13, 2021 |
| Date items must be sent by: | November 7, 2021 |
| Number of swap partners: | 1 |
| Description: | |
|
QnT Polka-dotted Party Hats #4 10-13-20 thru 11-7-20 --1 partner --1 polka-dotted print Party Hat quilt block each month mailed 12 1/2" X 12 1/2" ---each block will need 2 different polka-dotted prints and one white background print Party Hat Block --senders choice of color Polka-dotted print each month In 2019 I managed to accumulate a LOT of polka dotted print fabric from various swaps and I would like to use up some of that fabric. I think this will make a fun quilt when all assembled together. Each block will feature a different colored Party Hat in polka-dotted print fabrics with white or tone-on-tone white background fabric. The polka-dotted prints can be any color on any color background. 100% cotton quilting fabric Note: if you should get the same partner twice please send a different color party hat the second time to them. We would like to accumulate a wide variety of colored Party Hat blocks. Party Hat Instructions Cut: White or tone-on-tone white Background A. four squares 4 ½ X 4 ½ inches, for corners B. one square 5 ¼ X 5 ¼ inch cut twice diagonally for part of unit 1 First polka-dotted print C. two squares 4 7/8 X 4 7/8 inch - cut each once diagonally Second polka-dotted print D. one square 4 ½ X 4 ½ inches E. one square 5 ¼” X 5 ¼” cut twice diagonally Assembly Unit 1 = assemble 4 of these units using one of cut B and one of cut E for each unit. The end result will be a triangle with white on the left, and Second polka-dotted print on the right. Next sew one of the cut C triangles to the bottom of Unit 1 forming a square 4 ½ X 4 ½ inches. Once you have these 4 units finished you have completed the hardest part of this block. Assemble first row of block with one-piece A, then one Unit I, then another one-piece A Assemble second row of block with one Unit I, then another Unit I Assemble third row of block with one-piece A, then one Unit I, then final piece A Press block and mail. My instructions are labeled a little differently than the attached web-site pattern but end results are the same. Discussion | |
Discussion
Leave a Comment
You must be logged in to leave a comment. Click here to log in.
- Info:
- Home
- |
- About
- |
- Forum Rules
- |
- Terms of Use
- |
- Press
- |
- Advertising
- |
- Blog
- |
- Graphics & Stuff
- Help:
- New User Info
- |
- FAQ
- |
- Group Info
- |
- Glossary
- |
- Forums
- |
- |
- Contact Admin

